
For the record, I absolutely love hand sewing. As you saw in a previous post, I had to puncture the leather before attaching this piece to the bag in order to create the holes through which the hand needle will pass. Then, once glued down, I had to puncture the holes again so I could create a "path" through all of the layers of the leather. Each hand stitched component is sewn with double needles: one passing through from the top, the other from the bottom. When they pass each other they create the loop which becomes the stitches that hold it in place. The two pieces that cover the zipper (one shown above) have too much material to pass through the machine. I like it because you have a lot more control over the stitches. Sorry, Acci, I still love you, but I love my hand sewing needles more.

This photograph is entitled "what to do versus what not to do," featuring from left to right: what not to do, and what to do. I was in what I believed to be the final stage of my bag, working on the "maniglie," handles. I was so anxious to finish that I cut these pretty quickly, and while to the untrained eye they may look nearly perfect, they were ever so slightly off. I did not put enough glue down so I sliced into the salpa in a few locations on the handles. I could have covered up the blemishes when I painted the edges, but I could not let the last component of the bag I have been working on for two months be anything less than perfect. The two replacement "maniglie" on the right (what to do) represent one entire day's worth of work.

Yesterday my maestro turned to me and said, "Amanda, you are going to finish your bag tomorrow morning. I nearly screamed in excitement, as I have been working on this bag for what feels like forever. Then he continues.. "Oh wait.. the passantini."
Passantini are the small rings that hold something like a belt down when you buckle it. These are the details that make or break a bag. You can easily tell the quality and workmanship of anything just by looking at the small details such as these. My bag features twelve. These pieces are tiny, but take a very long time to make. See the photo above? That was my day today. Six long hours and 12 passantini later... I am nearly done.
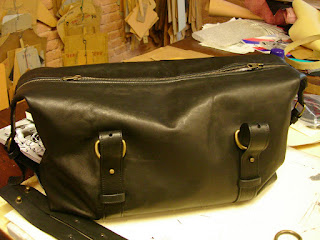
Unless I have to put more passantini on my bag (when Mao mentioned it I almost hit him) I should be finished with my very first bag tomorrow morning. Right now I am finalizing the placement of the holes on the incredible adjustable maniglie. And then... I will move right onto the next...


 This is where I was determining the length of the straps that will connect to the handles. I know this is not easy for you to see or understand if you are not a visual person, but it will all make sense once you see the final product. If you are not into the technical stuff, here is your cue to skip ahead. For you handbag designers and patternmakers, this is where the "maniglie," handles, will connect to the bag. The ring is actually upside-down in the photo, but the shoulder strap will be fixed on the ring from the top, and there will be "gimelli" below so you will be able to adjust the length of the handles, kind of like a belt.
 Configuring the placement of the "gimelli," which are the components that resemble cufflinks, and the "passantini," the small loop that will hold the strap in place. The "gimelli" will allow for the straps to be adjustable.
 My sewing has come a very long way since the day Acci ate my handbag. These straps are a sandwich of material, consisting of salpa #2 on the inside and two layers of leather on the outside. I cut all three layers precisely, and then to give it a finished edge, I executed the same technique I used when I finished the edges of the "tracolla" (straps) for my earlier projects, and the pieces of the passport cases. First, I "tingere," (paint) the edges with black opaque paint, and then pass the pieces through a machine that buffs the edges and removes the glue. Repeat the process twice, and you have a nice smooth finished edge, just like a belt.


 I would like to take this moment to thank my friends in Scandicci who are making this bag possible. I found hardware and components in some small shops in the center of Firenze, but I was not completely satisfied. I ventured out to Scandicci, one of the industrial zones on the outskirts of Firenze. Even though I was in the epicenter of the hardware universe, I still had difficulty finding exactly what I wanted. I had particular sizes with particular metal finishes in set in my mind and was determined to find nothing less. After hours of rummaging, I of course kept selecting the pieces that were at the very bottom of the drawer, of which they only had 3 from their last order in 1970. Then I would go through the drawer next to it just to see if I could find a 4th that was mis-filed... For those of you who know me this is typical. The effort will never be done in vain, as these are the details that will make my bags so quintessentially me.


 Posts


